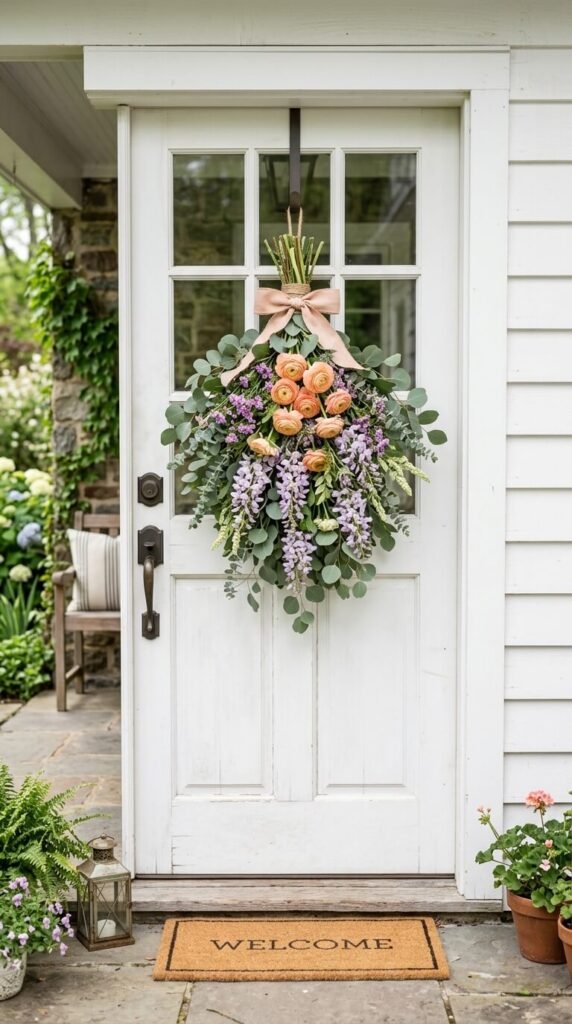
Your front door is the first thing people see — so why not dress it up for spring? A handmade spring swag is one of the easiest ways to add instant curb appeal, and the best part? You don’t need a florist’s skill set or a big budget to pull it off. With a handful of fresh stems, a few craft supplies, and about an hour of your time, you’ll have a showstopping door decoration that looks like it came straight from a boutique shop.
What Is a Spring Swag (and How Is It Different from a Wreath)?
A swag is an elongated, cascading arrangement — think of it as a wreath’s more dramatic cousin. Instead of a round frame, it hangs vertically and drapes downward, giving your door a soft, organic look. Swags work especially well on doors that are taller or narrower, and they tend to feel a little more modern and editorial than a traditional wreath.
Spring swags typically feature:
- Fresh or faux florals like tulips, ranunculus, or peonies
- Greenery such as eucalyptus, fern fronds, or ivy
- Textural accents like dried bunny tail grass, ribbon, or twine
- Seasonal colors — think blush, butter yellow, sage, and sky blue
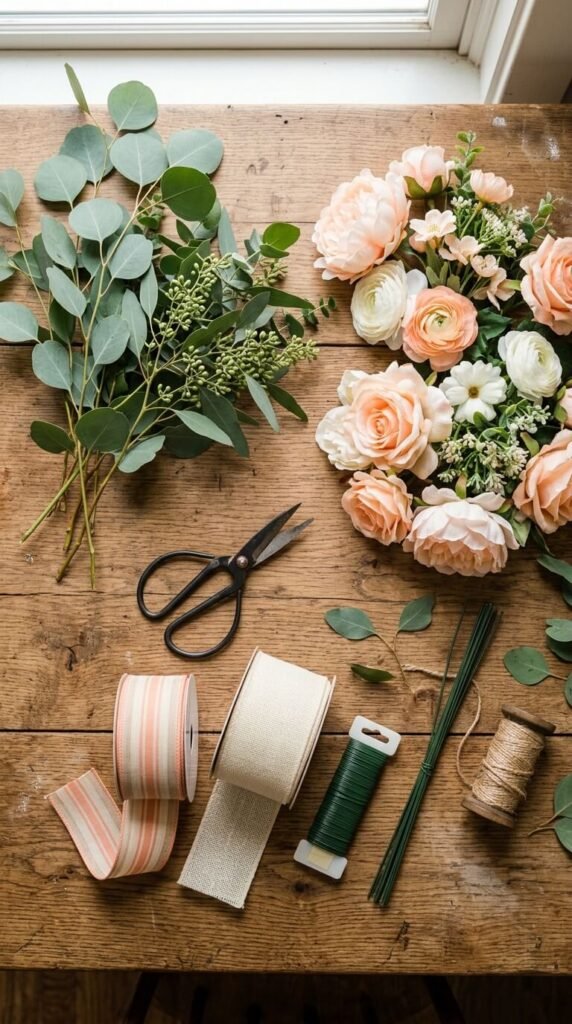
What You’ll Need
Before you start, gather your supplies. You likely have several of these on hand already.
Materials:
- A bundle of flexible greenery (eucalyptus works great)
- 3–5 focal flowers (real or high-quality faux)
- Floral wire or paddle wire
- Floral tape
- A length of ribbon (wired ribbon holds its shape best)
- Wire cutters or sharp scissors
- A Command hook or wreath hanger for your door
Budget tip: Faux stems from the craft store work just as well as real ones and last the entire season. Shop after Easter for serious discounts on spring florals.
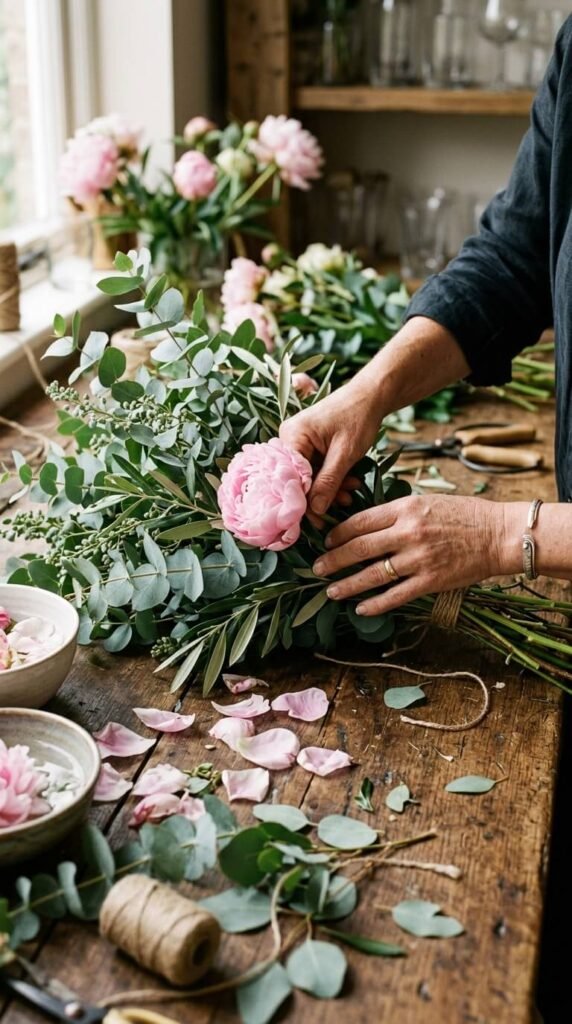
Step 1: Build Your Greenery Base
Start by gathering your greenery stems into a loose bundle. Arrange them so they angle in one direction — slightly fanned out at the top and tapering toward the bottom. Aim for a length of about 18–24 inches, which fits most standard doors without overwhelming them.
Once you’re happy with the shape, wrap floral wire tightly around the center of the bundle to hold everything in place. This is your foundation, so make it sturdy. Don’t worry about it looking perfect — the flowers and ribbon will cover the wire later.
Step 2: Add Your Focal Flowers
Now comes the fun part. Tuck your focal flowers into the greenery base, placing the largest blooms near the center and smaller buds toward the edges. Vary the heights slightly so the arrangement has depth rather than looking flat.
A few tips here:
- Use odd numbers of flowers (3 or 5) for a more natural, balanced look
- Let a few stems extend past the greenery for that loose, just-gathered feel
- If using real flowers, trim stems at an angle for better water absorption (though swags dry out quickly, so enjoy them for 3–5 days)
Secure each stem with a small piece of floral wire or floral tape at the back of the bundle.
Step 3: Tie Your Ribbon
A beautiful bow ties the whole look together — literally. Cut a generous length of wired ribbon (about 2–3 feet) and form a looped bow. Wired ribbon is key here because it holds its shape even in wind and humidity.
Attach the bow at the top of the swag where the wire is, covering the mechanics underneath. Fluff the loops outward so the bow looks full and intentional rather than flat.
Want a more relaxed look? Skip the structured bow and simply tie a loose knot, letting the ribbon tails cascade down alongside the greenery.
Step 4: Hang It Up
Hook a Command hook or adhesive wreath hanger at the top of your door — no drilling needed. Loop the floral wire at the back of your swag around the hook, and adjust the angle so it hangs straight or with a slight tilt, whichever you prefer.
Step back and fluff any stems or petals that shifted during hanging. Make small adjustments until the shape feels balanced.

Easy Variations to Try
Once you’ve made one swag, you’ll want to make more. Here are a few quick ways to switch up the look:
- Wildflower style: Use loose, airy stems like queen anne’s lace, cosmos, and dried lavender for a cottagecore vibe
- Minimalist: Just eucalyptus and a single oversized bow — no flowers needed
- Citrus-fresh: Tuck in a few small faux lemons or limes among the greenery for a bright, unexpected pop
- Double swag: Make two smaller versions and hang them side by side for a more dramatic entrance
Final Thoughts
A spring swag is one of those projects that looks far more complicated than it actually is. Once you’ve made one, you’ll be making them for every season. The process is relaxing, the results are gorgeous, and your front door will instantly feel more welcoming.
Save this tutorial for your next weekend project — and tag your finished swag so we can see it!